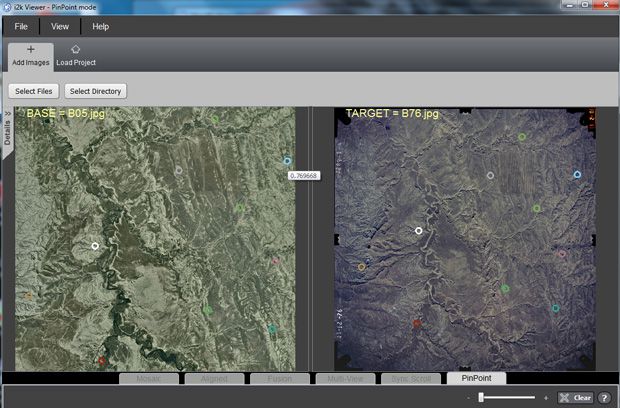
The first example illustrates the simplest version of running i2k PinPoint. This includes loading images, selecting images, specifying which image is the target, selecting the number of matches, viewing the results, and saving the matches to a text file.
After launching i2k PinPoint, we must load two or more images. In this example, as in many cases of running i2k PinPoint, we load just two. These images differ in appearance due to differing wavelengths, and they show a small amount of parallax. The following screen shot shows the images in a thumbnail display. To arrive at this point, we have clicked on the Add Images tab, then Select Files, and chosen the two images.
Next, we click the Process tab.
We still have to actually select the two (or more) images to run i2k PinPoint. To do this, we click on each image thumbnail we want. Then we click the Process button.
A dialog menu asks us to specify a target image. Here we choose B76.png
The remaining (one in this case) images are treated as base images. The target image can be thought of as the new image for which we are trying to establish matches. The base images can be thought of as the fixed or reference images, typically already georectified, on which we base the matching of the target image. On the other hand, as far as the computation of i2k PinPoint is concerned, the roles of the base and target images are often easily reversed.
Continuing with our example, clicking Next takes us to a display that allows us to add some information about each image.
While other examples illustrate how this is used, here we are going to skip this step and just click Finish to launch the actual processing of i2k PinPoint.
i2k PinPoint returns in a few seconds having correctly identified correspondences between the two images. These are shown in a new preview screen running a separate display program called i2k Viewer.

The colored circles show corresponding points in the base and target images. Notice that the points are spread throughout the base image (and therefore the target image). i2k PinPoint tries to generate correspondences across the entire image while at the same time sticking to well-matched locations. If you click on one of the displayed circles, as we have done here for the blue point on the upper right of the base image, two things happen.
First, the circle centered on the corresponding point in the other image is highlighted. Second, a number pops up under the clicked circle. This number is the weight, or confidence, in the quality of the match. It will be 1.0 only when the two points and their surrounding image regions have almost the exact same appearance. In the example shown here, the number is less than one because the image regions surrounding the point are somewhat different. If we were proceeding to compute a camera model for rectification based on these correspondences, these weights should be factored into the estimation process.
After viewing the results, we can close or minimize the i2k Preview window. Back in i2k PinPoint we see a pop-up message telling us where the correspondences generated by the software were saved.
When we look at this text file, we see
                                                    BASE = B76.jpg

                                                    TARGET = B05.jpg

                                                    NUMBER_OF_MATCHES = 10

                                                    226.907 542.587   184.08 601.857   0.792667

                                                    617.176 849.319   674.237 932.427   0.804781

                                                    750.613 521.524   804.477 530.641   0.814545

                                                    455.042 366.081   436.8 370.429   0.739572

                                                    570.025 167.805   556.963 121.229   0.720551

                                                    868.47 740.608   963.005 780.424   0.755074

                                                    967.171 250.955   1038.63 187.58   0.760107

                                                    320.883 818.56   319.307 920.732   0.723724

                                                    235.331 295.118   168.862 306.692   0.645689

                                                    71.2785 715.531   20.125 817.426   0.630043
The first three lines give information about the base and target images and the number of matches. The next ten lines give the actual matches, with five numbers on each line. These are the x and y coordinates of the matching points in the base and target images and the weight of the match, which was discussed above. All coordinates are in the original resolution of the image, relative to the upper left corner.
Generally, ten correspondences are only enough to show that the images are well-matched. We might want to see more correspondences, and we might even want to specify our own control points to match in the base image. The latter currently exists only in the library and command-line interfaces to i2k PinPoint; it will be added to the GUI soon. On the other hand, the former is easily done in the GUI. In particular, to change the number of points, we go back to the step just before clicking the Process button, and click on the Options tab:
Here, we have changed the number of matches to 100. This can be done by typing the number we want, or by moving the slider. (For now, please ignore the Aggressive Setting slider button.) After doing this, we can click Process, and the matches are generated once again. This time 100 correspondences are displayed
These are also saved to the output text file, as before.

